DIY Band Choker T-Shirt
Hello beautiful people! Todays DIY is on a super cute band choker shirt. Ive seen so many cute ones that celebrities are rocking and I just had to have one.
I looked some up to purchase, but the price was just outrageous. So I decided to try my hands on making one for myself. All you need is scissors and your shirt!
I didn't have an old band shirt so I went out and bought one from Target. I picked out a Nirvana shirt, but they have so many to choose from! It was $12.99 and I got a size large. I chose a big size because I liked the baggy style. But don't be afraid to chose any size you want!
So Step 1: Outline the Cut
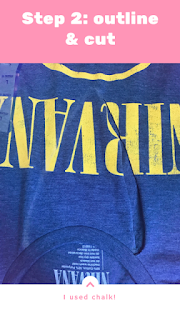
You want to make sure you have an even triangle that isn't too wide. You don't want all of your cha chas hanging out. Or maybe you do. Do you lol. I used white chalk so i could brush it away after. If you don't have chalk i think white eyeshadow would work, as long as you don't go too crazy.
Step 2: Cutting the sides
You want to start by cutting the sides of the v-cut. It doesn't have to be perfect. Especially with this style because were going for a more rugged look.
Make sure your V is wide enough and actually in positon on the shirt. I made the mistake of cutting it off a bit, But that's why you should start off with a small v so you can fix mistakes and make it bigger if you like.
Step 4: Cut across the shirt seam
This is going to give the shirt the choker look. As you can see i made mine a bit more rugged. You can do that or make the cut more clean.
& Voila!:
You've got a brand new shirt! This literally took me less than 10 minutes. Super simple. You really don't need to drop $50 on a shirt that you can just as easily make at home for less than filling up your gastank. I hope you guys enjoyed this quick DIY! xoxo


Comments
Post a Comment